Mountains are fun to fly in, and with X-Plane and such a wide variety of beautiful add-on scenery from Frank Dainese and Fabio Bellini, there is never a better opportunity to talk about high-altitude mountain flying and power management.
As a general disclaimer, this will be a general introduction to the topic as there are entire multi-week workshops to discuss these principles and how they affect real-world flying. Our focus will primarily stick to the basics and how you can get the most out of your helicopter flying on the simulator.
What’s the big deal with mountain flying? I mean, airplanes operate at high-altitude all the time and they never go into specific considerations. Airplanes also have a different set of considerations. They’re typically limited to runway surfaces or measured-out distances (dirt strips, fields, etc.) and those often take advantage of the pre-dominate wind in a specific region.
Helicopters, by design, are able to operate off a wide variety of different surfaces, locations and unimproved area’s that may rarely see an aircraft. Additionally, because of a helicopters mission, sometimes pilots may find themselves at high altitude, attempting to maintain a hover or land on a tiny pinnacle far outside of designed performance parameters.
Some may say, this is where helicopters excel and what makes them such a valuable asset to search and rescue. A plane might be perfect for finding a lost hiker, but a helicopter can find them and then rescue the wayward explorer.
In real flying, performance planning is key to flying in these environments. When analyzing the specific mission, pilots have to make several decisions as to whether they can perform the mission. Typically, these can be divided into two categories. Internal factors and External factors.
Internal factors include: What kind of aircraft is being used, single or multi-engine, mission equipment required and tasks to be performed are just a few that a pilot will consider.
External factors include: The mission itself (did someone experience a medical emergency on top of a 7,000-foot mountain?), weather, including winds, temperature and altitude, equipment available versus equipment required, other SAR assets.
Internal factors are often variables that the crew are able to mitigate or solve problems for. External factors are typically more restrictive, and the crew may find they have to react to the external factors rather than plan for them.
Given that most of us will only apply these principles to simulators, we can change some of those factors that real aviation crews cannot avoid. Weather, gross weight, aircraft used, and time of day are all factors that a simulator pilot can modify based upon their experience level to make the task more challenging or more fun as they see fit.
What makes Mountain Flying so Scary?
So, what makes mountain flying scary? The answer is both simple and complex; wind and weather. Some simulator pilots fly in beautiful, VFR weather all the time.
Frankly, I don’t blame them, if we’re going to spend some money on some beautiful scenery, then your darn right we want to be able to see it! Although, if you’re a VFR pilot, I challenge you to jump to some of these mountainous regions and turn on real weather and look around at what you see.
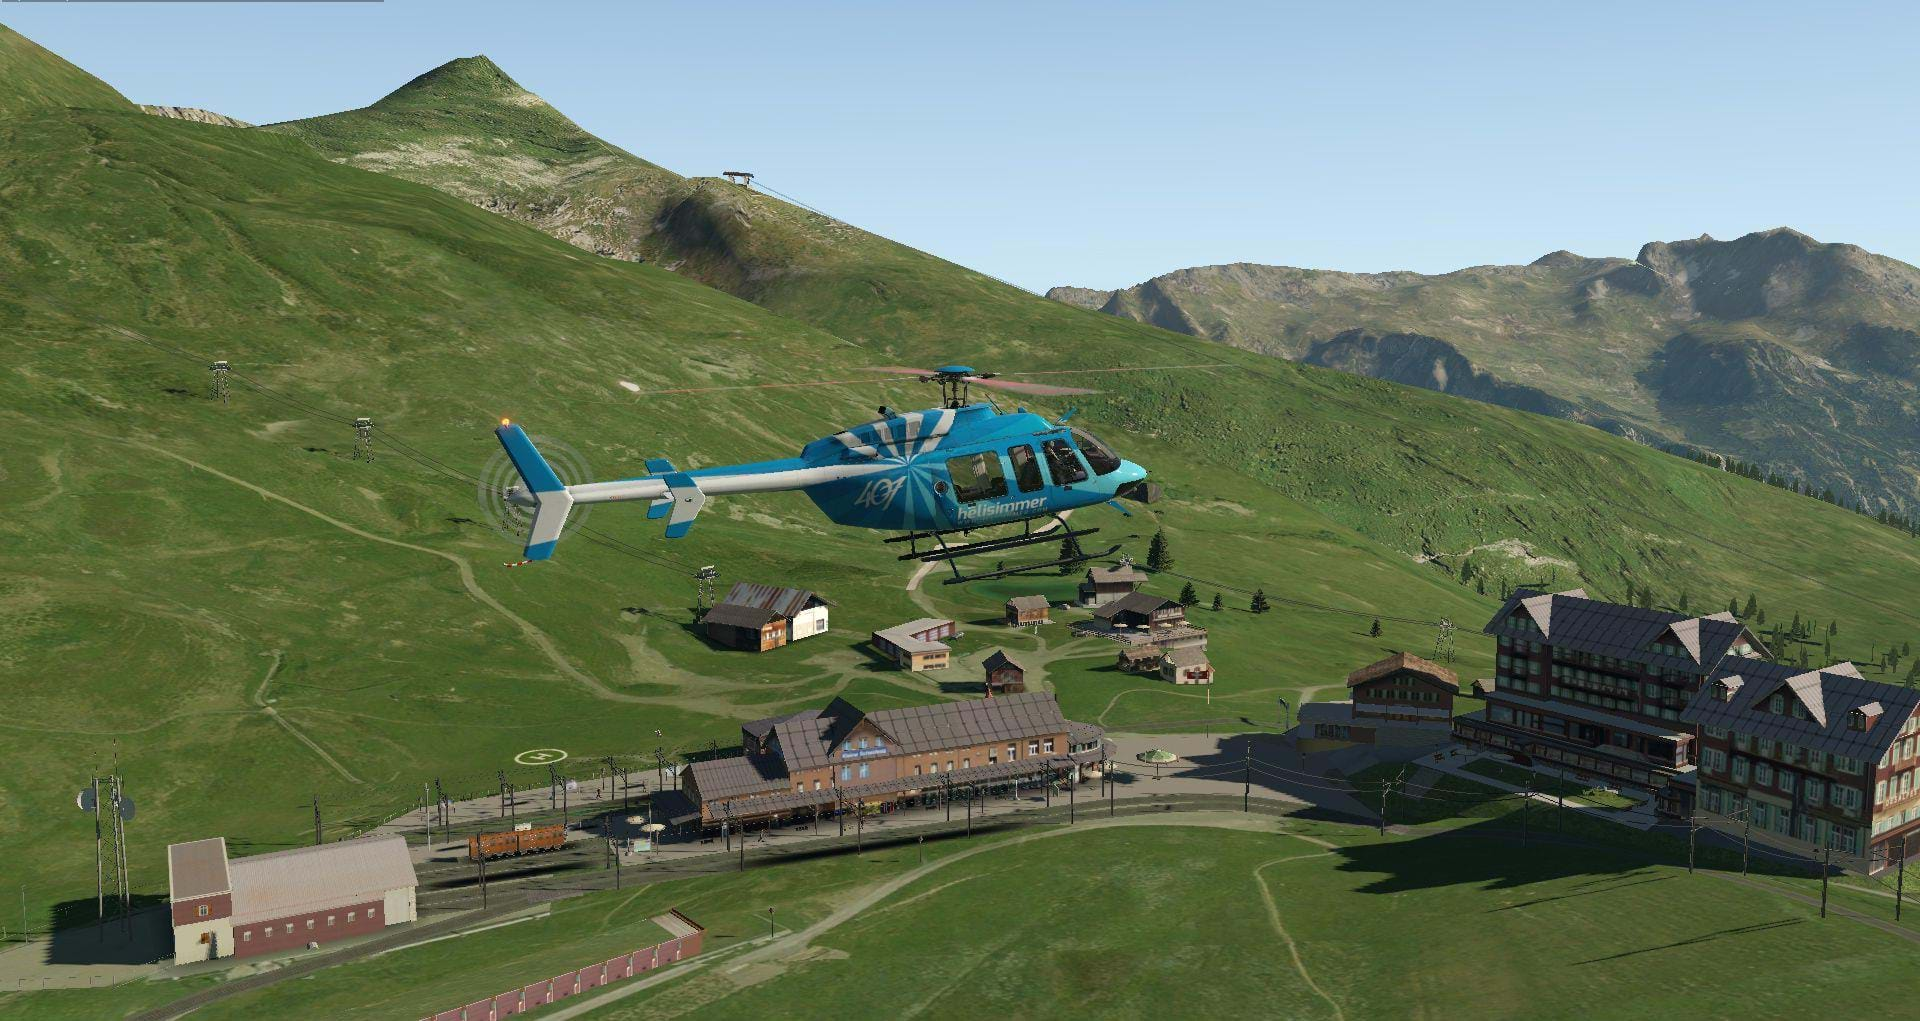
Terrain and weather but also, man-made objects, can present some tricky situations for helicopter pilots. What are some of the obvious hazards you can identify in this scene? (Answers will be below).
Often, if your located in a valley, it’s just usually the valley walls and the landing area ahead of you. The peaks can often be surrounded by clouds, fog or obscuration. Couple that with degraded performance due to altitude, high winds and quickly changing weather patterns and you have a nightmare for a real pilot!
Here’s where the real problem is: mountains create their own weather. Just due to sheer scale, mountains serve as a means for the planet to balance out its own eco-system. Warm, moist air might flow into a mountainous region from off a body of water then, because of the mountains, that air is funneled through valleys, up mountain peaks and suddenly plunged into cold air or icy surfaces.
From there, nature takes its course and snow might be the effect on the opposite side of the mountain range. On the flipside, coastal mountain ranges usually see a significant amount of rain.
Remember I asked you the about hazards in the screenshot above?
Buildings – tall buildings surround the LZ. There might be situations where local agreements might preclude over-flying man-made structures but the other consideration is people. Try not to over-fly large groups of people or crowds just in case there are any problems. Powerlines – we can see multiple ski-lift power lines and the train powerlines are evident in this picture. In reality, powerlines are often invisible from 200 feet and can provide a lethal hazard to helicopters. Find the structures that support them and over-fly the structure if able. Antenna – like powerlines, antenna can have supporting wires which are invisible from altitude. Generally, over-flying antennas is recommended. Sloping terrain – We can see the mountain climbing to the left of the picture and the helipad is situated between the mountain and the buildings. Of primary concern is how the wind will react to the terrain and how much room we will have to maneuver down near the LZ.
Mountain Winds and Turbulence
To understand how to fly in mountains, we first have to learn how to read the wind. Wind is vitally important to helicopter operations as it can have such a profound effect on our performance. The neat thing about wind is that is follows the same principles of fluid dynamics as water or other gases.
If you’ve ever watched a flowing stream or seen how water reacts to obstructions, you’ve, in essence, seen precisely what wind is doing when it reacts to terrain. Having the ability to predict this action, to visualize how wind will react to terrain, will enable you to understand how wind will impact your flying.
Consequently, air temperature is the catalyst for local or system-wide air movement. Temperature is the driving factor for differential pressure, updrafts, downdrafts and often, turbulence.
Prevailing Wind
As a general rule, winds above 2,000-3,000 feet above ground level (AGL – also known as prevailing wind) move parallel to the isobars (isobars are a series of points utilized to map atmospheric pressure). Below that 2,000-3,000 AGL region, winds are dominated by surface forces and friction.
Generally, during the winter, surface wind is dominated by prevailing wind interacting with terrain. During the summer, wind is dominated by surface conditions, including local and valley convective winds. In layman’s terms, during the winter, the prevailing wind (at altitude) reacts to terrain and causes the surface conditions.
During the summer, the terrain and unequal heating and cooling drive most of the wind and generally flow parallel to valleys and drainage.
How does terrain affect wind? Well, during summer months, hillsides, rocks and rising terrain warms quicker than the air at the same altitude in the center of the valleys. This creates higher wind velocities (including updrafts and downdrafts) closer to the hillsides and lower velocities away from drainage walls and above the valley floor.
If a helicopter is trying to fly out of a valley, understanding where the wind is coming from and how the heating and cooling of the day, might provide the additional lift necessary to climb out of a steep region. As the day starts to cool or regions are obscured by rising terrain, that denser air starts to sink first towards the drainages and then the valley floor.

Several terrain factors profoundly affect wind direction and velocity during the day and at night. Deep, narrow valleys create a natural Venturi (the Venturi effect is a phenomenon that occurs where fluid passing through a constriction experiences lower static pressure when constricted but a higher velocity – essentially, as air passes through a constriction, its velocity must increase to move the same volume of air).
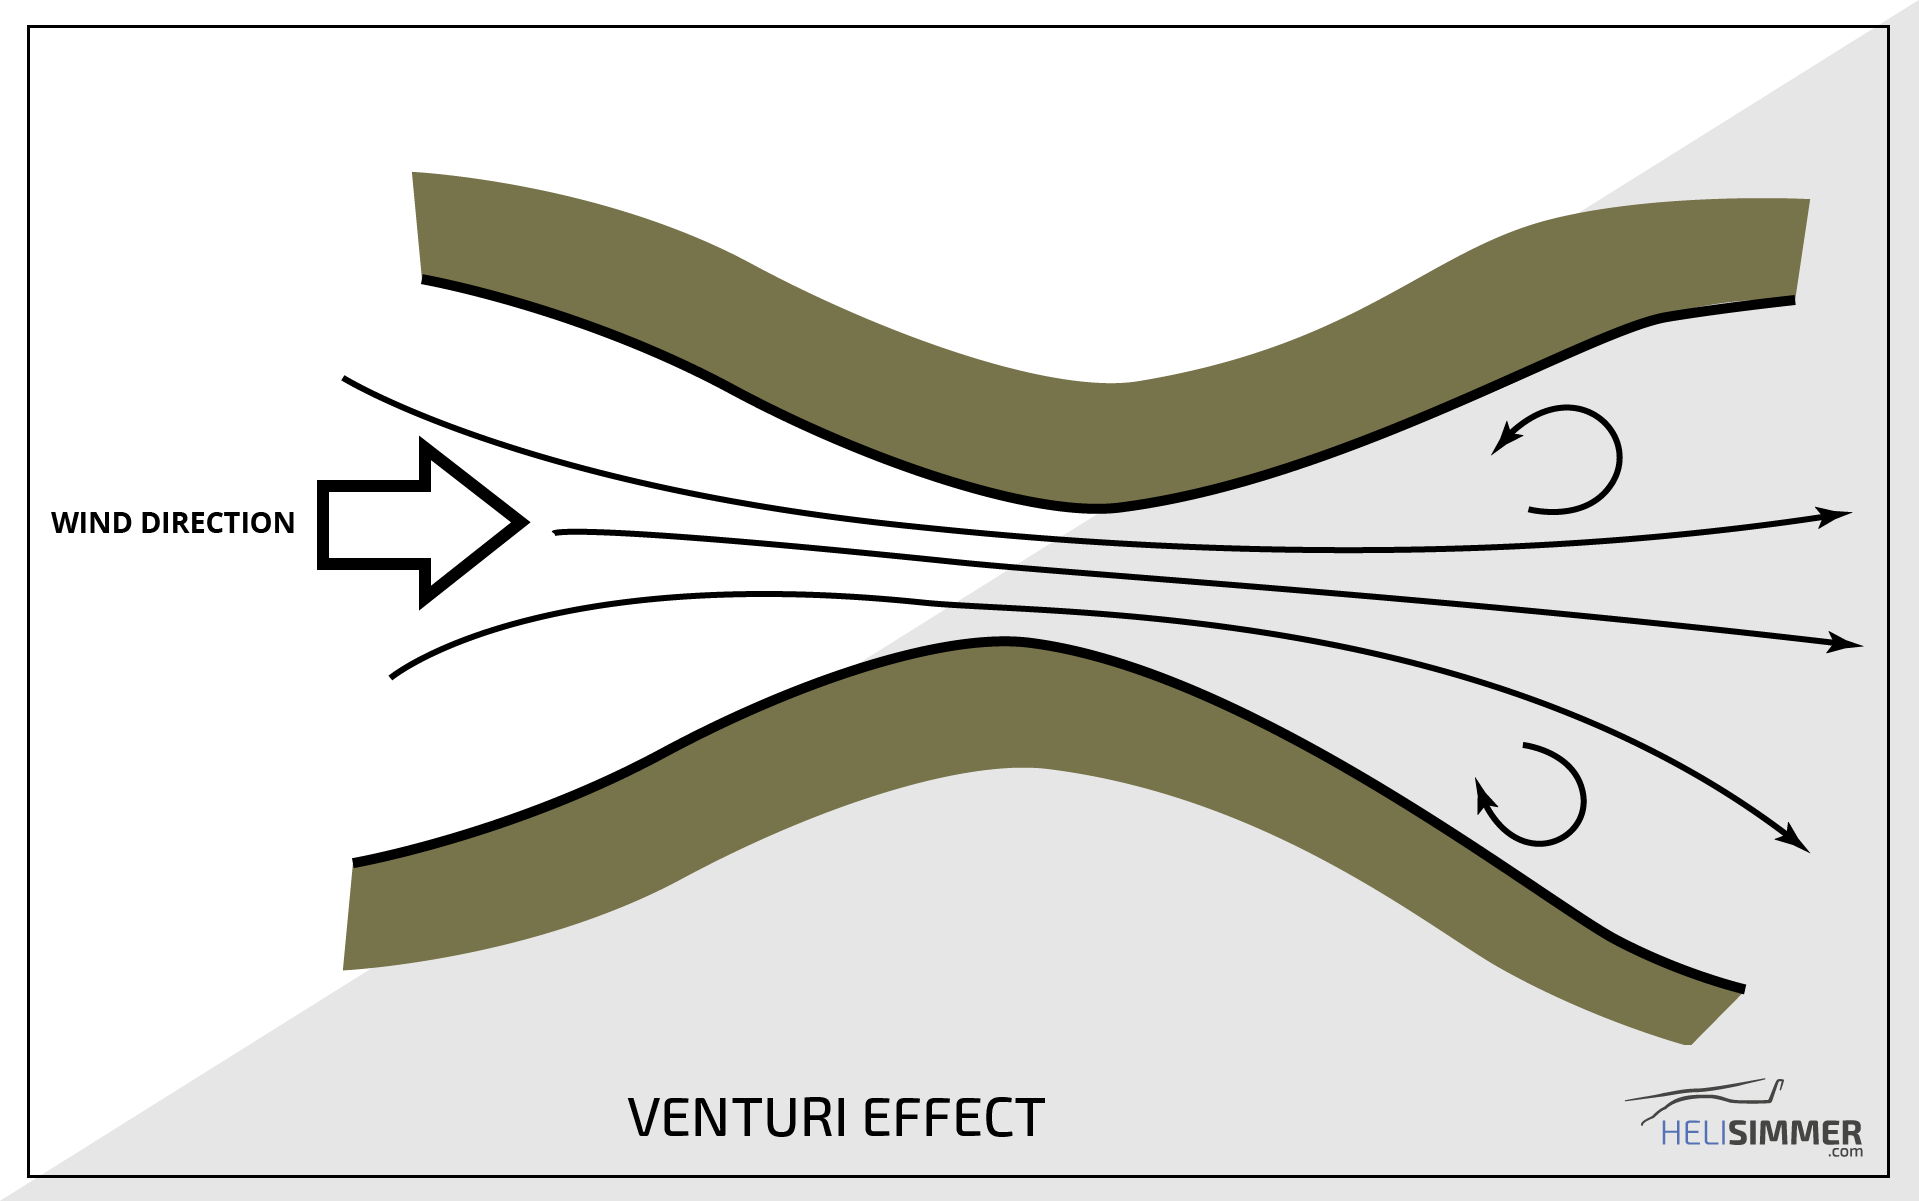
This Venturi affect in valleys and canyons can result in significantly higher wind velocities and more turbulent air. Additionally, terrain direction and vegetation can affect this air velocity. Vegetation and drainages act to reduce wind velocity, whereas areas where valleys turn, create strong local updrafts.
Convective Wind
Convective winds are much more insidious and dangerous. Unlike prevailing winds, convective winds are constantly in motion, either rising (during the day) or descending (at night).
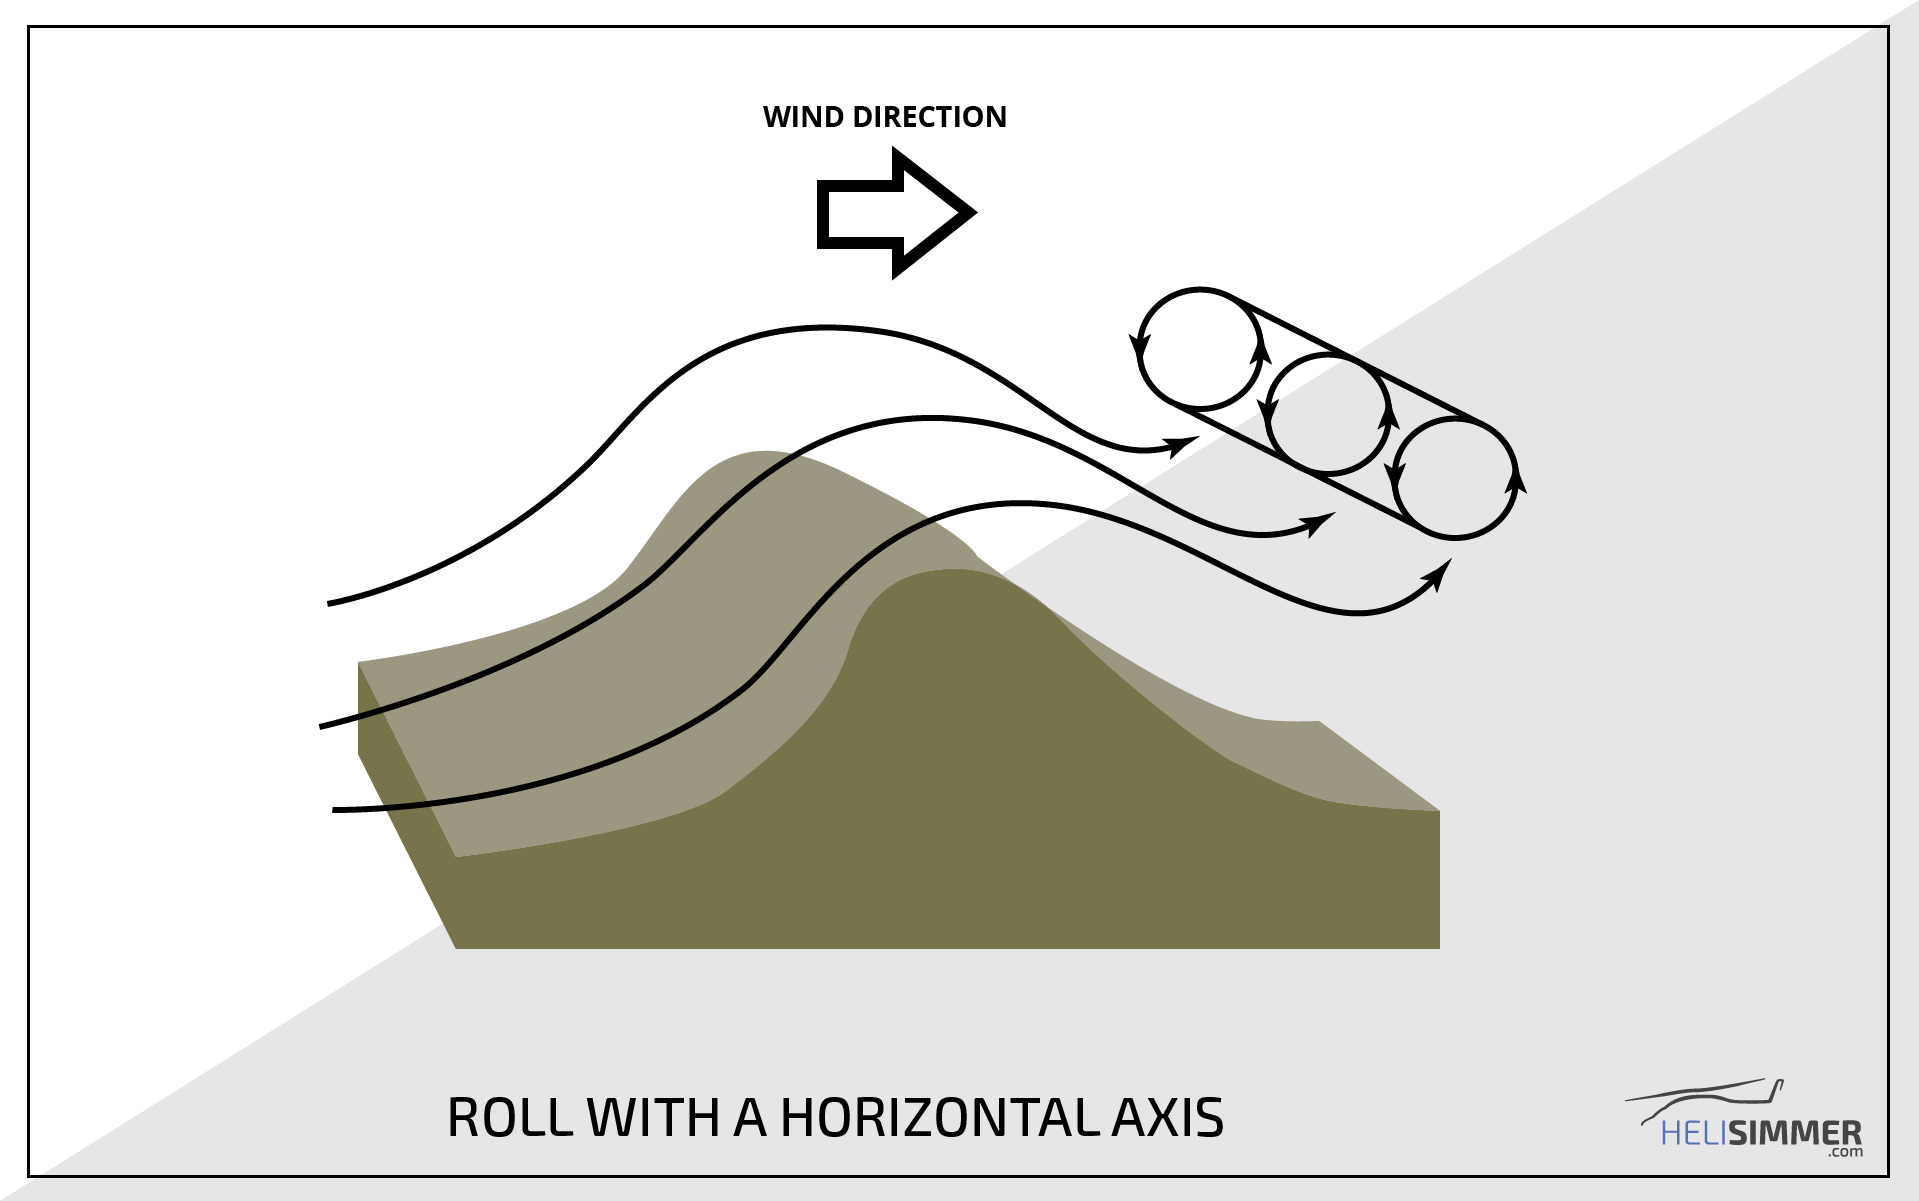
As convective winds interact with terrain, colliding and merging with prevailing winds, they create turbulent zones. Imagine a rock sitting in the middle of a stream. As the water impacts the rock, the flow splits and creates an area of instability around the rock and on the lee (against the current) side of the rock. Convective winds interact in much the same way.
In a saddle and on narrow ridges, it’s possible to have the nose of the helicopter in a headwind and the tail of the helicopter in a tailwind. In these situations, its best for the pilot to choose a definitive escape route and to land as close to the terrain feature that may be creating the adverse conditions.
Local and valley convective winds are more like to occur on warmer days but that’s also when we have less power available due to high density altitudes and are more susceptible to loss of tail rotor effectiveness (LTE).
In a vast majority of LTE incidents during mountain flying, convective winds and the pilot’s inability to detect adverse conditions were a significant factor. It’s important for pilots to detect the presence of convective activity before committing to an approach. Convective activity is typically laminar initially with the greatest effects being felt close to the ground (around 200 feet AGL).
The easiest way to detect these updrafts is to find terrain features that may produce them and well away from the landing area and with enough altitude to affect a recovery should it be necessary. If terrain features near the landing zone are producing convective winds, then it’s a sure bet that the landing zone is experiencing the same effect.
Surface Wind & Turbulence
Surface winds and determining the factors that affect them are just as important in that final 200 feet of the approach as local and valley convective winds. Like local and valley winds, surface winds are the result of the interaction between prevailing wind and the terrain it interacts with. The key difference is that surface winds are greatly impacted by mechanical turbulence.
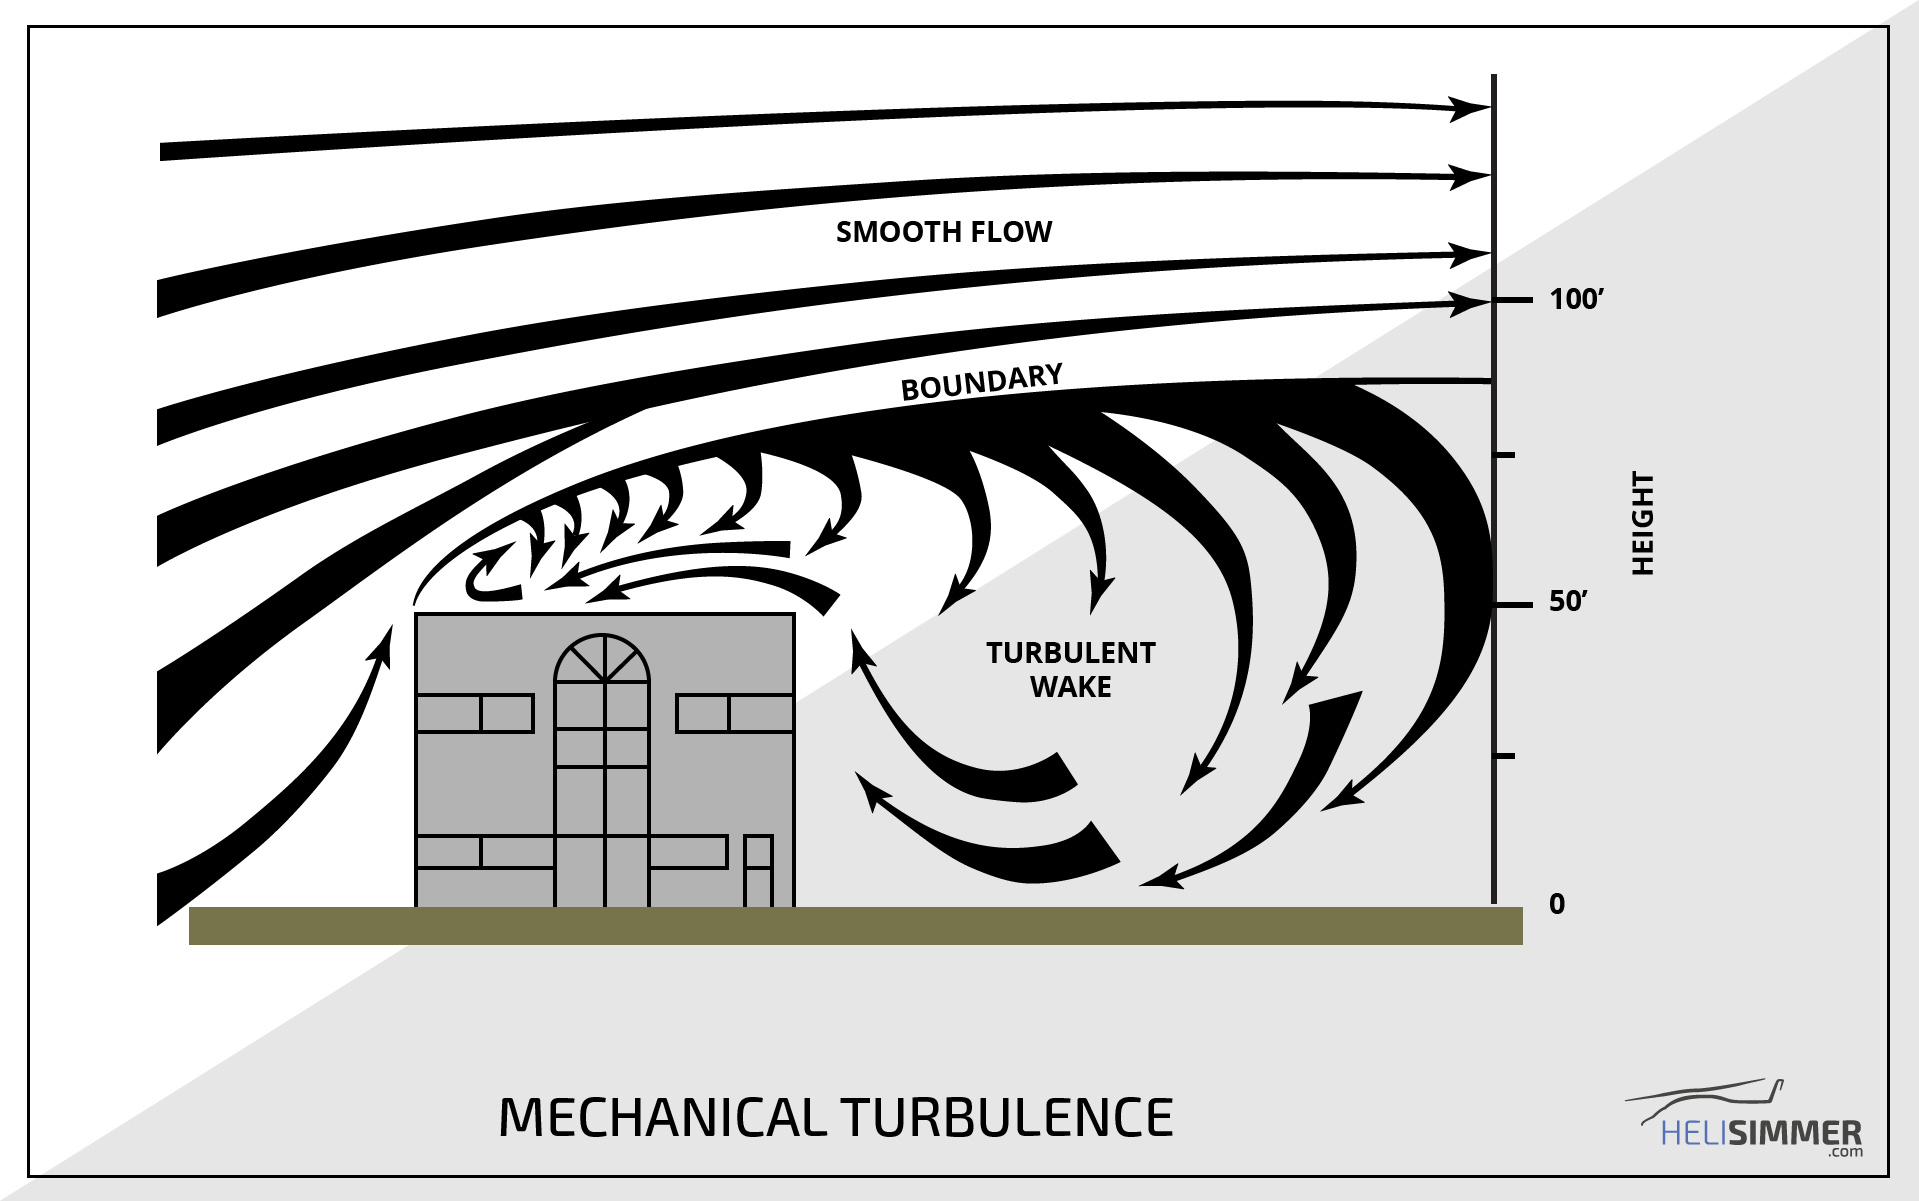
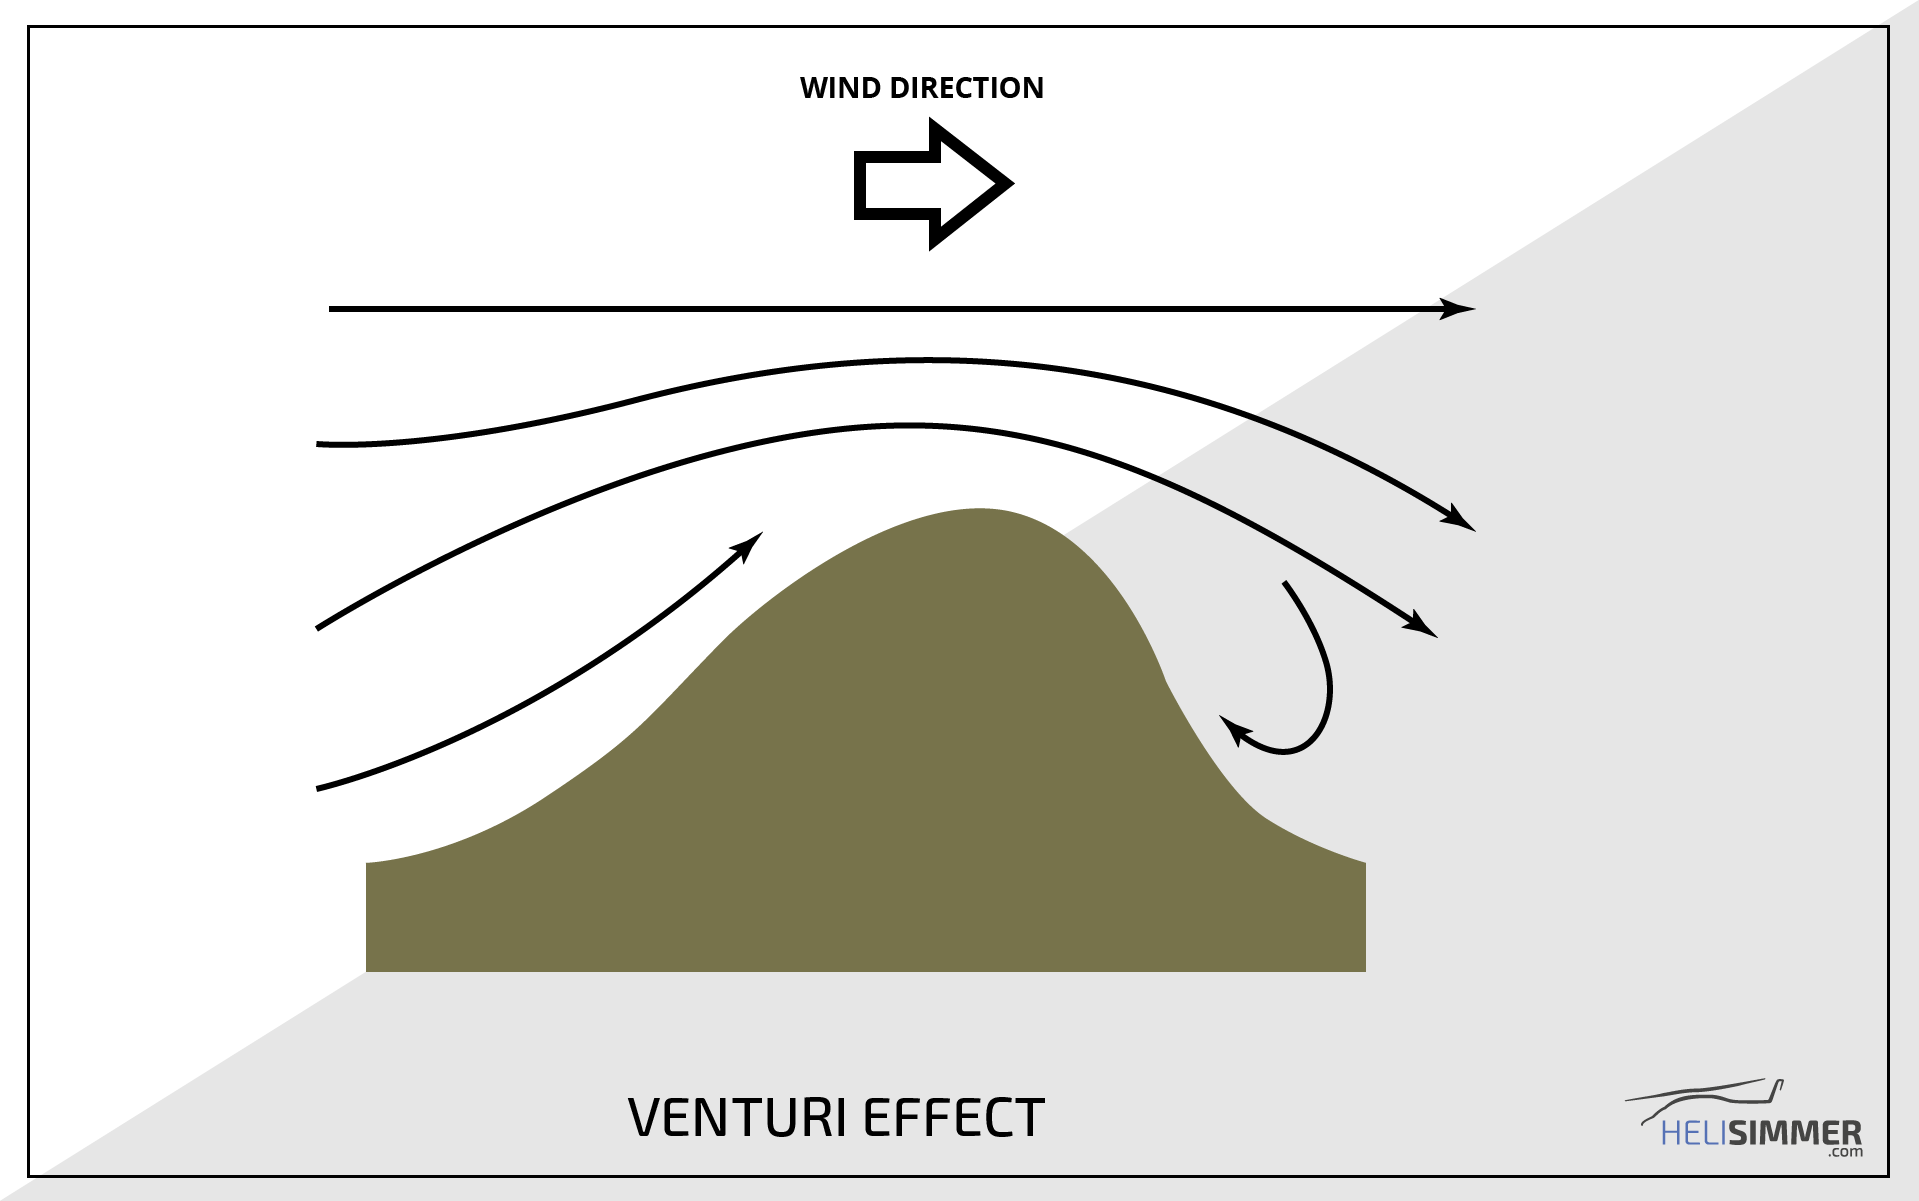
Turbulence can be categorized as thermal, frontal, mechanical and wind shear. For the sake of our discussion, I’ll focus primarily on mechanical turbulence as it’s the most common interaction with surface wind as we make an approach to land and descend through 200 feet. Mechanical turbulence is the result of an air mass interacting with obstacles.
Like the rock in the stream example, as the water accelerates around the rock creates a lull on the lee side of the rock, water rushes into the void to fill the low pressure on the other side. Mechanical turbulence works the same way. Rather than accelerating around the just the sides of an obstacle (like the rock in the stream), mechanical turbulence also accelerates over the top of the obstacles and creates wake turbulence on the other side.
The strength of the mechanical turbulence is determined by the wind speed, type of obstacle, angle of the wind and overall strength of the prevailing wind. The result can be unpredictable and dangerous wind changes as the helicopter descends closer to the landing zone. Couple that with rotor down wash, potentially limited power and a restrictive landing area and things can quickly get busy for the pilot. Pilots landing into these area’s need to be on guard for LTE, settling with power and rapid changes in wind direction.
Techniques
Before we start this section, let me say first off, I’m not an expert on flying in these conditions. I’ve done so on several occasions and I’ve had some considerable academics on the matter but that doesn’t make me an expert by any means and what I’ve included in here are techniques.
They’ve often been demonstrated to me by far more experienced pilots and a good rule of thumb is that if you have an old pilot showing you a technique, then they’ve gotten old by relying on good technique.
Recon, Recon, Recon
How do we prevent ourselves from getting into a bad situation? By following systematic, sensible questions on every approach, we can answer a lot of questions about that last 200 feet of the approach that could potentially ruin our day. If we break the landing sequence into separate phases, we can identify key points to assess before we commit ourselves to an approach.
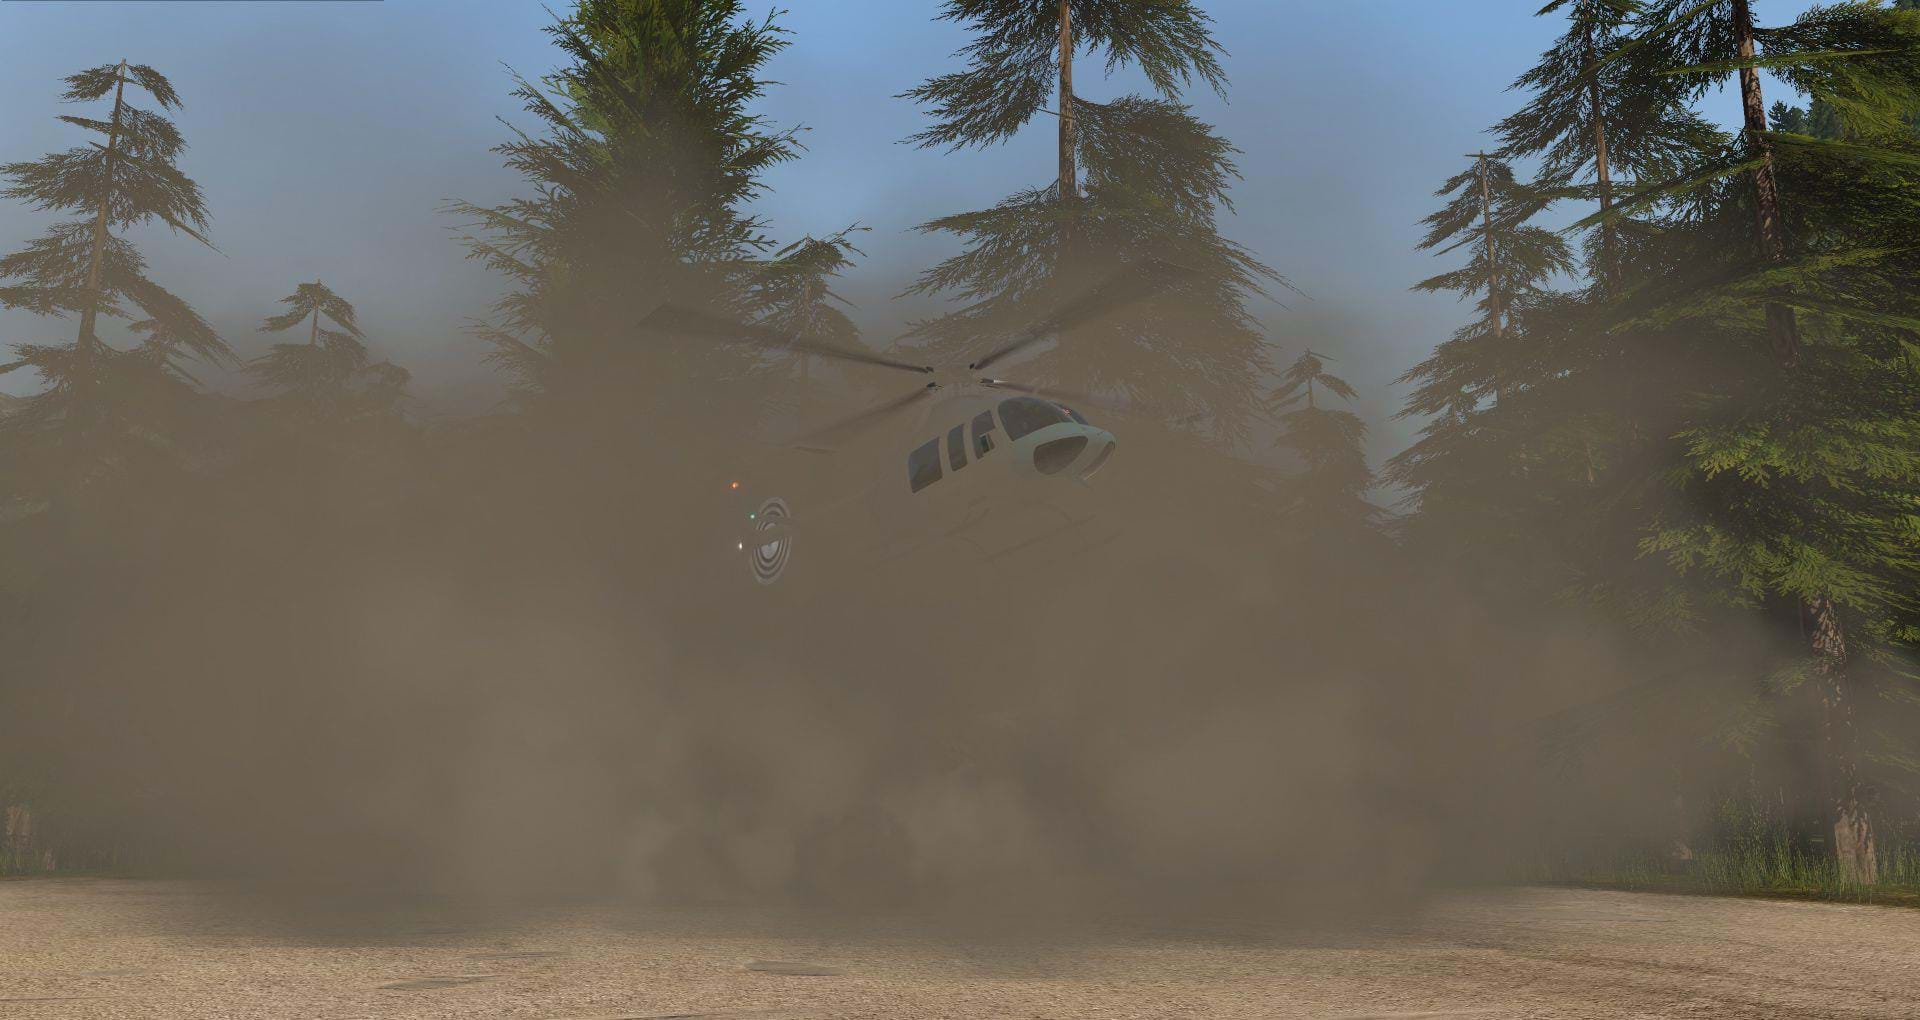
Being cognizant of conditions at a landing zone (LZ) is a crucial part of good pilotage. Knowing before-hand if dust/snow or other obscurations are going to be a hazard helps to build a better picture of where your going and how you will react to those situations. Knowing those hazards is even more crucial if you anticipate being power-limited or in an LZ with tight confines.
The High Reconnaissance: Calling this phase a reconnaissance is mis-leading; most think that “reconnaissance” is limited to doing a recon of the landing zone only. I think that it’s better to think of the high recon as an all-inclusive recon of the maneuver to be performed.
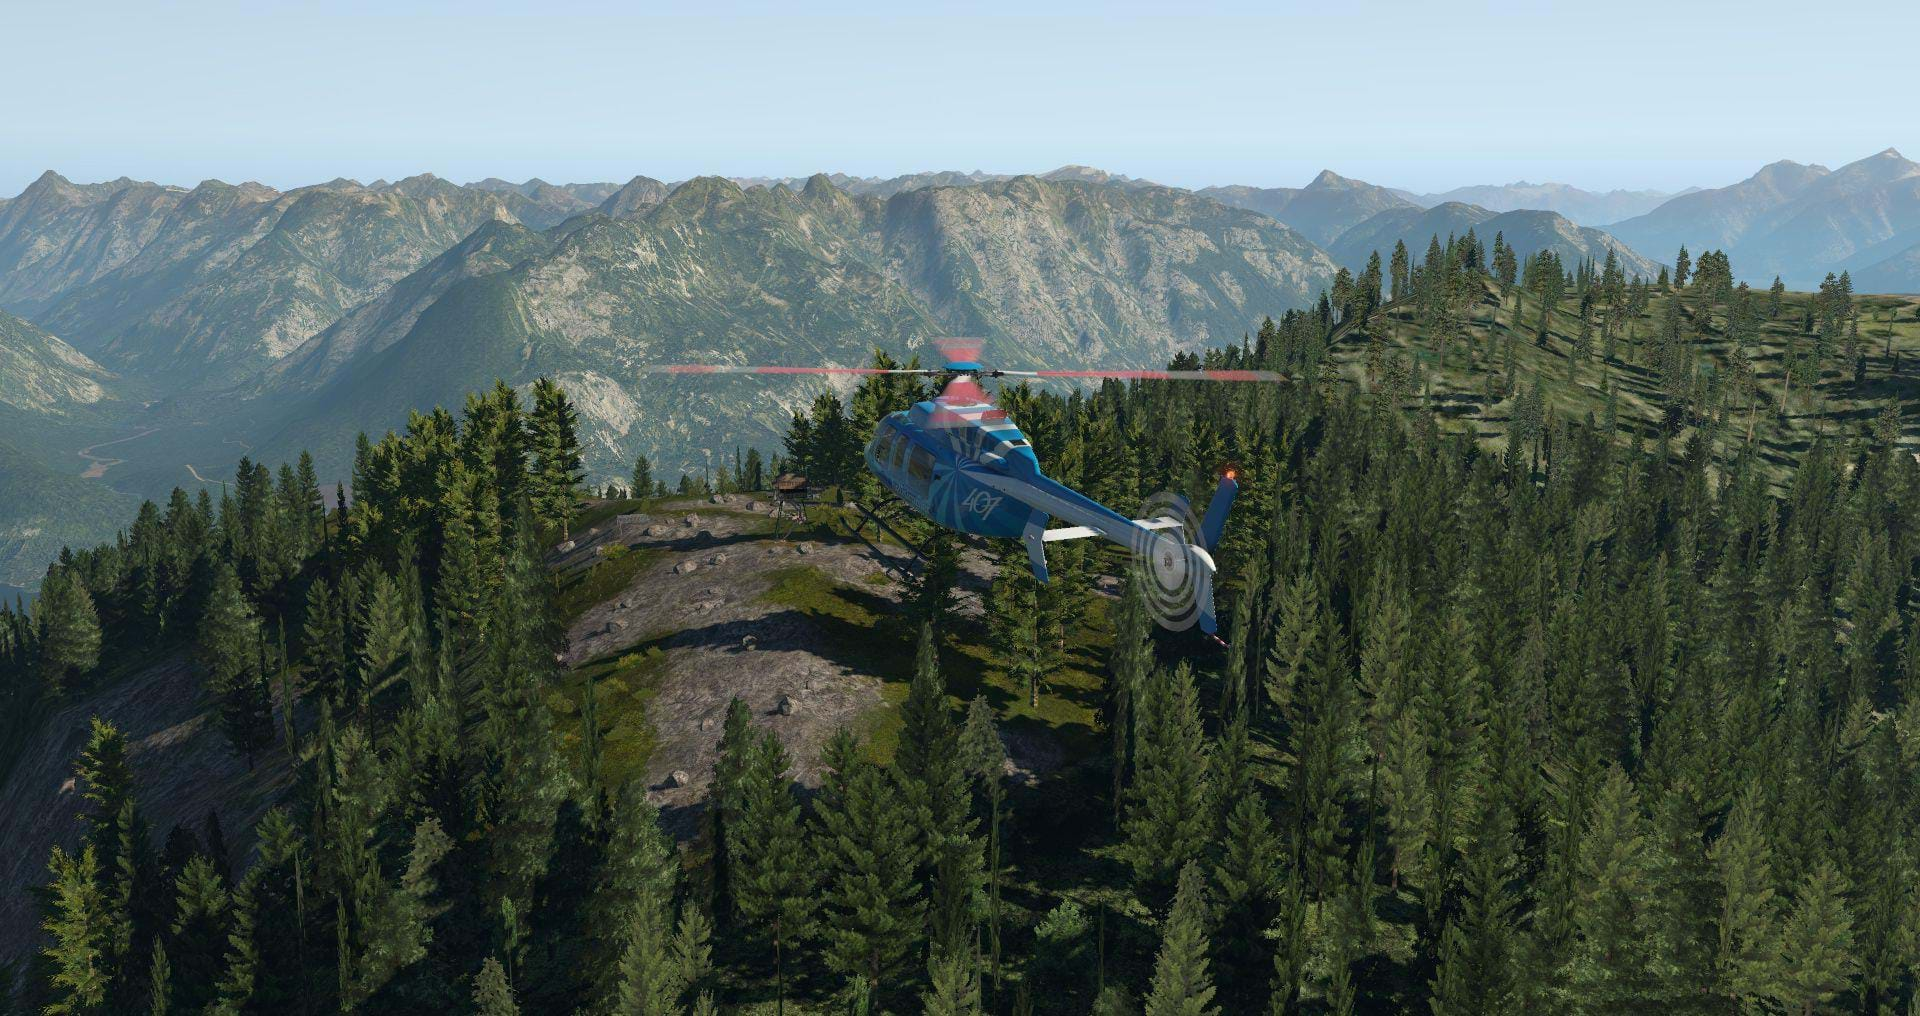
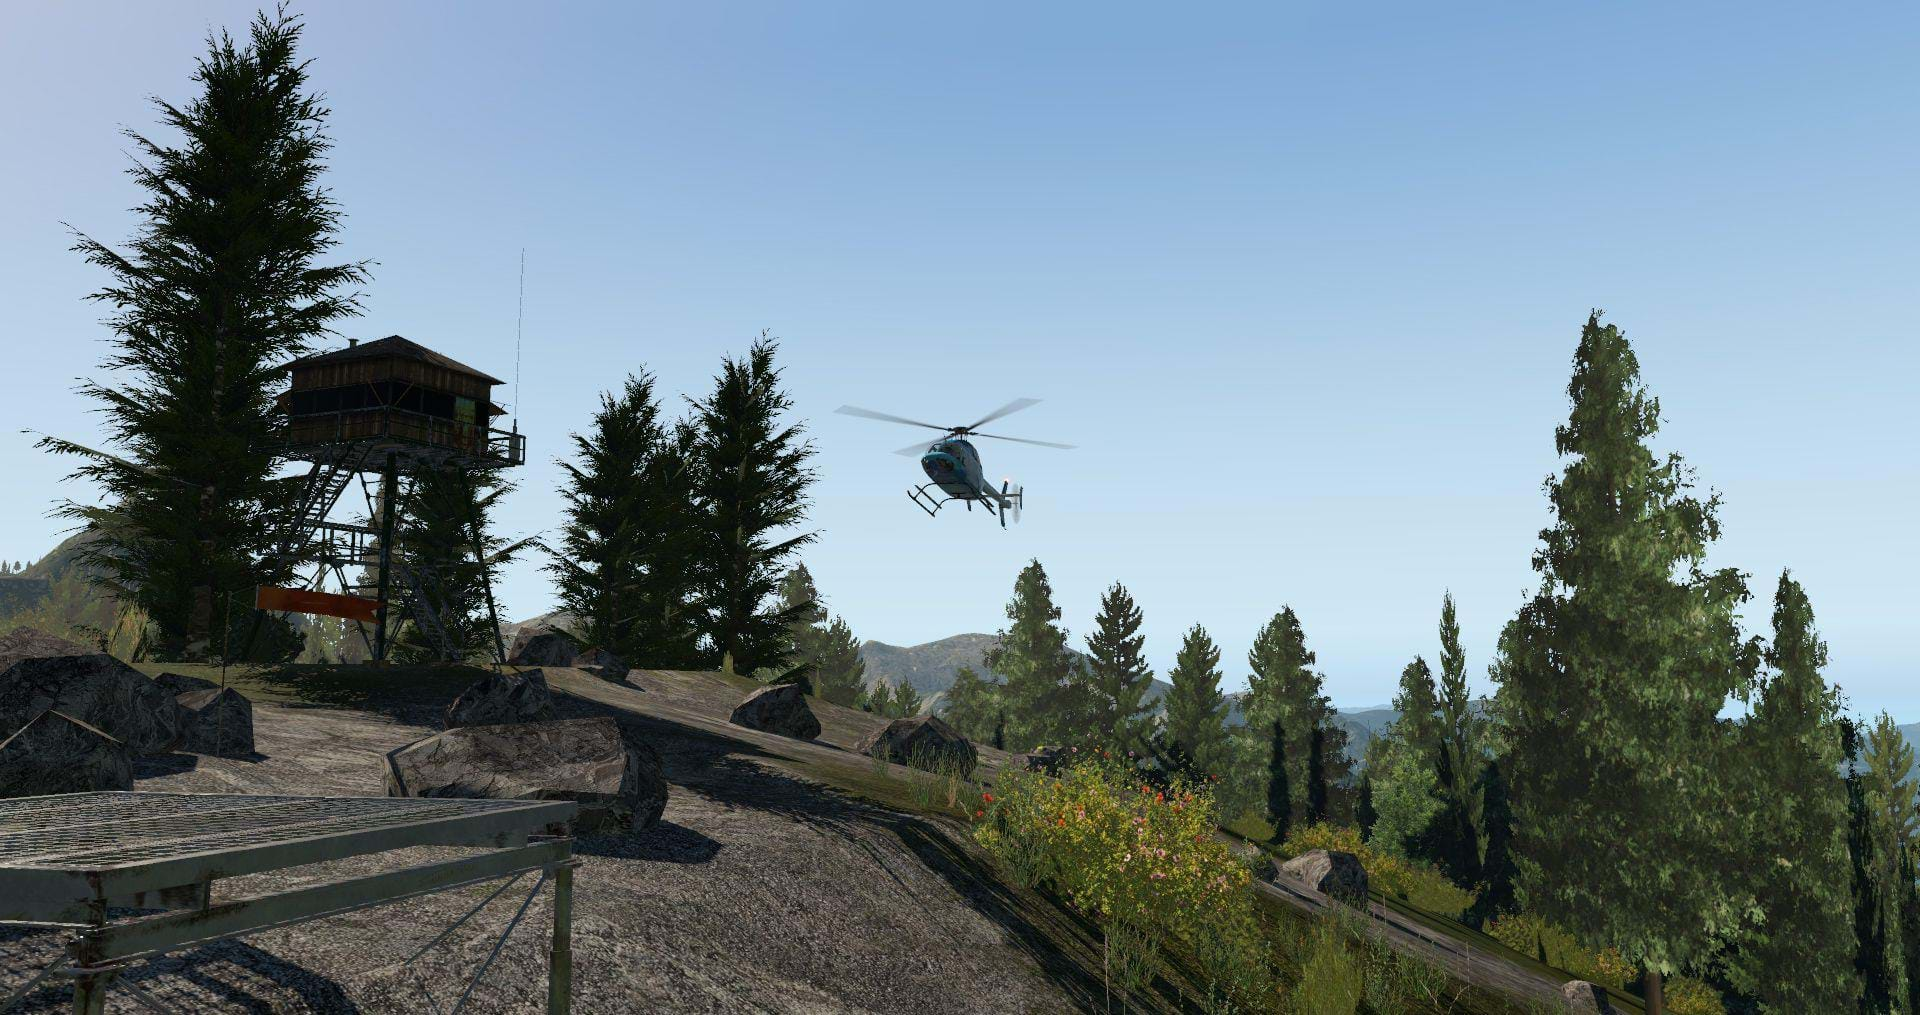
On the high reconnaissance, its important to understand how wind will affect the landing area and to visualize how we will make our approach. We can identify immediately that the hill top is open (which will benefit us on the approach) but may also introduce a lot of turbulence with the amount of obstructions (boulders and trees) down near the landing zone.
Identify Landing zone
First, let’s assess the suitability of where we are intending to land. How big is the landing zone? Can we identify any significantly sloping terrain?
What’s the surface and surface conditions? Are there trees, rocks, ravines or animals and obstacles that affect our approach and touchdown? Are we landing with the long axis of the landing zone?
- Size
- Slope
- Surface
- Long-axis
- Obstacles
Power Requirements
This isn’t meant to be a performance planning session. Ideally, we’ve done that before even climbing in the cockpit.
Although, based off our take off hover power check, we should have a good assessment of how accurate our performance planning was. By this point, we should know some essential information: How much do we weigh? How much fuel have we burned to get here? What’s our max torque available? The torque required to hover Out-of-Ground Effect/In-Ground Effect (OGE/IGE)? Difference between max torque available and torque required?
- Max Torque available
- Hover Torque required
- Torque difference
- Gross Weight
Wind
Based off our weather analysis prior to take off, this shouldn’t be the first indication of what the wind is doing in the region we’re flying in. We should have a general idea of what the wind is doing at our landing site and monitor trends we noticed as we were flying there.
Additionally, this step isn’t limited to only one portion of the approach. We should be monitoring the wind through-out the entire approach phase all the way until the skids are on the surface and the collective is down.
But this is a good time to practice some of the concepts we discussed earlier. What is the predominate terrain? How will that terrain or the ambient conditions affect the wind? Are we in a valley? On a pinnacle? Up against a cliff face? Is it the middle of the day versus early morning or evening? All of these conditions will affect how the wind is reacting to the terrain and how that will affect our approach.
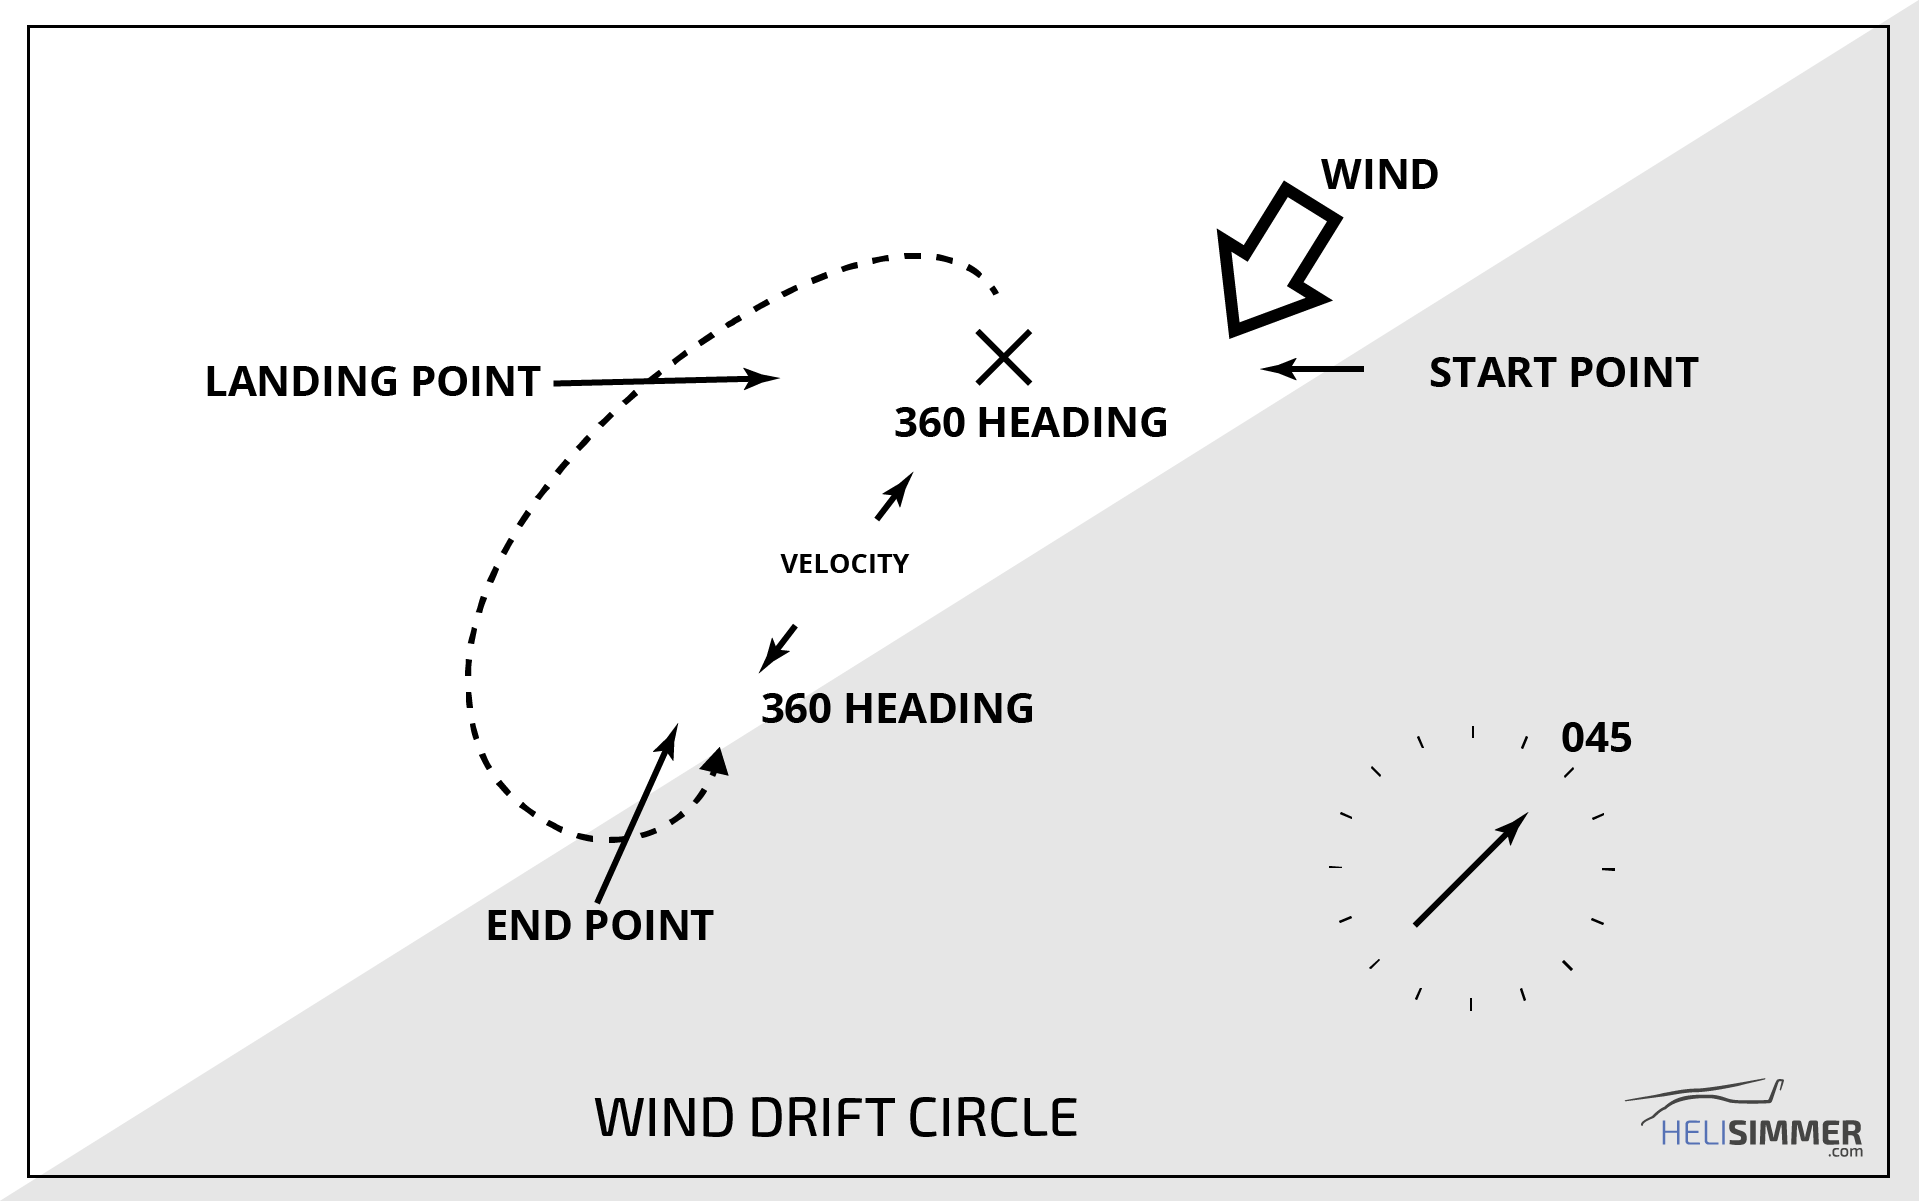
What indications do we have of the wind while we’re flying? Several actually; the first indication is: what is the wind doing to our helicopter? Do we have to crab against the wind while we’re flying (ground track versus heading)? What is our ground speed and how different is it than our airspeed? Outside of the cockpit, what visual indications do we have? Smoke, trees, water can all provide clues. These are hard to identify/simulate in the simulator so what’s a more useful technique?
If we fly over our landing zone and have sufficient space to maneuver, we can do a constant airspeed, constant rate 360 degree turn around our LZ and notice how far we’ve drifted.
- Wind Assessment – assess what the winds are doing
- Wind Analysis – confirm/deny our assessment constantly during the approach
Route
This is something that I notice a lot of simulator pilots ignoring. But as a real pilot, you get to be pretty good at finding a good route in and a good route out of any landing zone.
Rotor wash is a real threat to people, equipment and structures. But more importantly, identifying a safe route that takes advantage of the wind and then identifying an escape route/departure route is important as well.
Why wait until we’re low, slow and using a lot of power to decide how and where we’re going to escape to? Identify these routes prior to starting the approach so they can be quickly recognized. Additionally, some LZ’s might require more than one approach to attempt a landing, having an escape route will make it much easier to transition from slow flight to forward flight to try again.
- Wind – should dictate your inbound route and escape
- Calm wind – allows you to use the route that offers the best escape
Approach and Landing
Low Reconnaissance
A lower approach angle not only put the helicopter into IGE quicker, but also made it easier to determine obstacles on the approach path. Although, sometimes winds and obstacles might make a lower approach angle unfeasible (based upon the line of demarcation – which we will discuss in the next article), our approach path here worked well and provided easy access to the landing pad.
Simply put, this is the constant recon you perform as we start our approach. Constant analysis of the wind, helicopter and landing site now occupy your mindset and give you that final few minutes to detect any hidden obstacles (such as power lines) that might deny a landing.
Identify your escape route (it might look different than when you did your high recon) and if necessary, execute a go-around prior to descending through ETL or any obstacles that are higher than the landing spot.
- Verify wind – Always
- Verify Escape route
- Verify Touchdown point and landing site suitability
Landing
As we get to the final few feet of the approach, we can better see obstacles, a different line of sight for our approach and escape routes and assess the surface of our landing site. Additionally, a significant threat is dust or snow.
As we start our landing phase, is dust and snow present? Are these obstacles that will prevent a successful landing or takeoff? Is the spot we selected for landing significantly sloped and will it exceed our abilities to land?
- Obstacles
- Obscuration
- Slopes
Takeoff
We’ve already predicted our available torque prior to the approach and landing and now that we’re safely on the ground, how are we going to get out again?
A general rule of thumb for confined area’s is hover torque + 15%. Whatever torque it required to hover, add 15% and then a buffer if necessary, to get back out again. If you don’t have that much torque available, do not attempt the approach. But now that we’re on the ground, we can compare how much actual torque it required and how feasible our takeoff route looks.
Assess how much torque will be required to pick up and if we can hover or if we have to do running take off (accounting for additions or subtraction in gross weight depending on people/cargo dropped off). From there, we can make a more intelligent decision about our takeoff.
- Predicted Torque – Adjusted based off actual conditions during the landing, forecasted for takeoff assuming a level surface and zero wind
- Expended Torque – How much torque did we actually use during our approach and landing
- Actual torque – always note how much torque it requires for you to hover. With some experience, it can teach you how to better manage your power.
Conclusion
Hopefully, I’ve provided a lot of great stuff to think about and practice in your simulated flying! Although we’ve also covered a lot of material, in further articles I’ll start to discuss how wind can affect mountains and different techniques to land on different sorts of surfaces and environments (if there is a demand for it – if you guys don’t want to read this stuff, let me or Sergio know).
Again, this has only been a very brief overview; I know it’s a lot of information but if you apply some of these techniques next time you fly around some of Fabio and Frank’s scenery, you’ll notice that many of the basic questions start to make sense and will apply to all of your helicopter flying.
Many of these techniques and different techniques can be found in some great books published specifically about mountain flying and if anyone from the Army’s High-Altitude Army Aviation Training Site (HAATS) is reading, I want to thank them for providing some great information that I graciously used to pass-on this content.
Thanks for reading! Blue Skies and tailwinds!